You’ve created a smashing video. The audio is great. Crisp and clear. The video quality is excellent. The topic you’ve chosen is one that you know your audience will love.
The only caveat? The video uploads with two very ugly black bars. Not only is it distracting for viewers, but it also doesn’t make your video feel and look professional. Not what you wanted.
So what do you do? You crop the video.
In this article, we’ll provide you with a step-by-step guide for cropping a video and show you how to amp up its quality. We’ll also discuss why cropping your video content is a crucial step to take in today’s video-first world.
Without further ado, let's dive in!
What is the difference between crop, trim and slip?
But first, let’s discuss the three terms that are usually used in the video editing world interchangeably but are quite different -cropping, trimming, and slipping.
1. Cropping
Cropping a video means you adjust the edges of a video clip or an image. It is when you resize the actual video on a canvas to perhaps remove any wanted parts or to make the video fit the desired aspect ratio.
Suppose you made a video with your phone's camera with an aspect ratio of 16:9 and now want to post it to Instagram. Since Instagram only allows 3:4, and 1:1 sized pictures and videos, you’ll have to crop the video to post it on Instagram.
2. Trimming
Trimming a video refers to removing footage from the clip, either from the beginning or the end. This step is most commonly taken when you want the audience to focus on the important bits, so you remove the unnecessary parts.
Imagine you made a 10 minutes long video. Still, the relevant parts lie between 4 and 8 minutes, so you’ll trim the beginning and the end to make the video useful to you.
3. Slipping
Slipping, on the other hand, is when you edit a clip such that the length of the video does not change, but you can move the footage inside your clip both forwards and backwards.
You have a 10-second video, but you only want to use 6 seconds of it. In that case, you can either use the first or last 6 seconds or any combination between 1 and 10 seconds - that is, moving your footage forwards and backwards.
However, the total duration of the clip will remain the same (6 seconds).
6 easy ways to instantly crop your video
No matter the device you use, cropping is one of the easiest video editing options. Here's how you can crop a video on different devices and software:
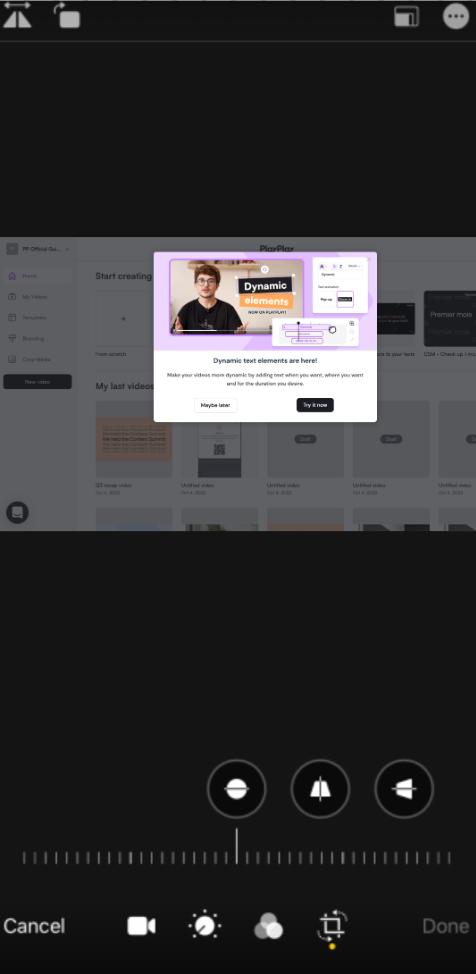
1. How to crop video with PlayPlay
Cropping a video with PlayPlay is super easy and barely takes any time. Discover how easily you can create professional videos with PlayPlay's platform, whether it's for Linkedin, Tiktok, Instagram or more. No more wondering, just use PlayPlay to crop videos, adjust them to your different platforms and bring your content to life.
Here’s how you can crop your video with PlayPlay.
- Open PlayPlay app.
- Add your video to the screen.
- Next, click on the Edit button.
2. How to crop a video on Windows 10
On Windows 10 you need an external application to crop your video. Some easy (and free!) ways to crop your videos include.
Crop a video on PowerPoint
You can try to crop your content with PowerPoint. It’s easy, has zero learning curve, and is super convenient.
- Launch the PowerPoint app on your Windows 10 device, and open a new presentation. On the first slide, insert the video you want to crop.
- Next, click on the video. From the options available, choose Format. You’ll now see a Crop function visible on the tool panel.
- To crop the video, drag the crop handles.
- When you are pleased with how your video looks, save it and export it. You can save the video by going to the File menu. From there, click on Export and choose the Create a Video option.
- You’ll then be prompted to choose the resolution and location of your file.
- Click on Create Video and your video is ready for use.
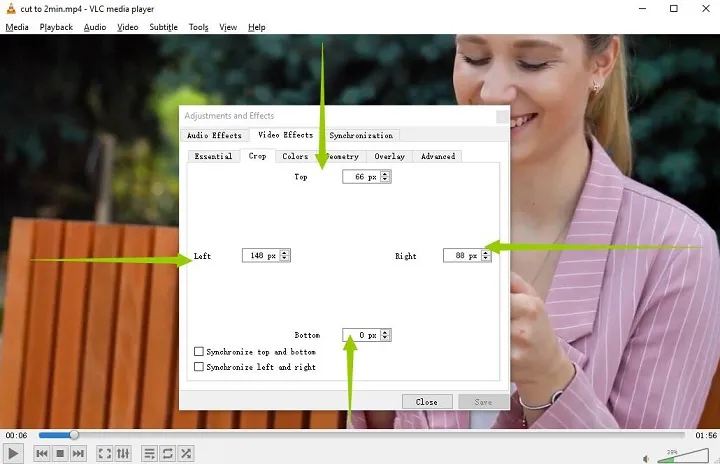
Crop a video on VLC
VLC is a pretty popular media player, owing to the fact that it is compatible with a wide range of devices and softwares.
Moreover, it is a free tool!
- Install the VLC media player if you don’t have it already. Once downloaded, launch the app.
- On the VLC app, open the video you want to crop. You can do this by clicking on Media and then hitting the “open file” button.
- Now that you have imported the video to the VLC player, mark the area or areas you want to crop.
- You may also crop the intended areas by going to Tools, and then clicking on Effects and Filters. Then, tapping on Video Effects will lead you to the option to Crop.
- When you are satisfied with how your video looks, click on the Save button at the bottom right corner, and name it appropriately.
Crop a video on Windows Movie Maker
The Windows Movie Maker is an app built within the Windows for editing purposes. Likewise, it can also be used to crop your video content.
- Launch the Windows movie maker app. Import the video you want to crop.
- Once you have it imported, drag and drop the video to the Movie Maker timeline.
- On the animations tab, go to Pan and Zoom.
- Decide whichever effect suits you best. You can try multiple effects and see which one you like the most.
- Once done, you can save the cropped video.
Your video is now ready.
3. How to crop video with Movavi Video Editor
Not only is Movavi Video Editor simple and effective, but it also works on various platforms. Here are the steps to crop a video with this tool:
- Launch Movavi Video Editor on your device.
- Import your video files by clicking 'Add Files.'
- Locate the 'Crop' tool within the editing options.
- Select the desired portion of the video to retain, adjusting for aspect ratio or removing unwanted elements.
- Finalize your edits by clicking 'Save.'
Your video is ready to be shared on any platform.
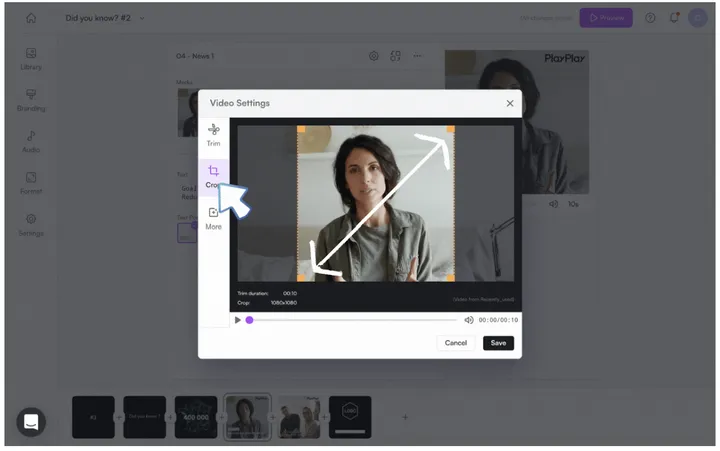
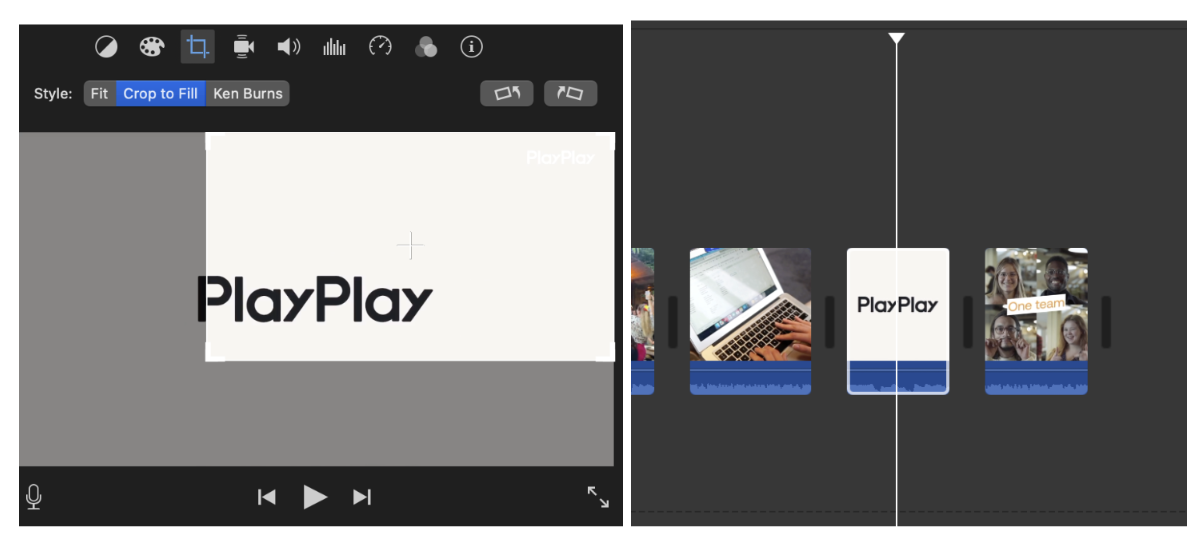
4. How to crop a video on Mac
To crop a video on your Mac:
- Go to the iMovie app on your device and select the part you want to crop.
- On the iMovie toolbar, click on the crop button (it should be right next to the palette icon).
- Click on the "Crop to Fill" button - an adjustable window should appear over your video. You should be able to move and resize the frame in iMovie, which you should do until you are absolutely satisfied with the result.
- To finalize the sizes, click on the apply button (a blue coloured circle with a tick).
You can now accomplish the final step and crop a video according to your desired ratios on your Mac with iMovie. You’ll have it ready with some audio in no time.
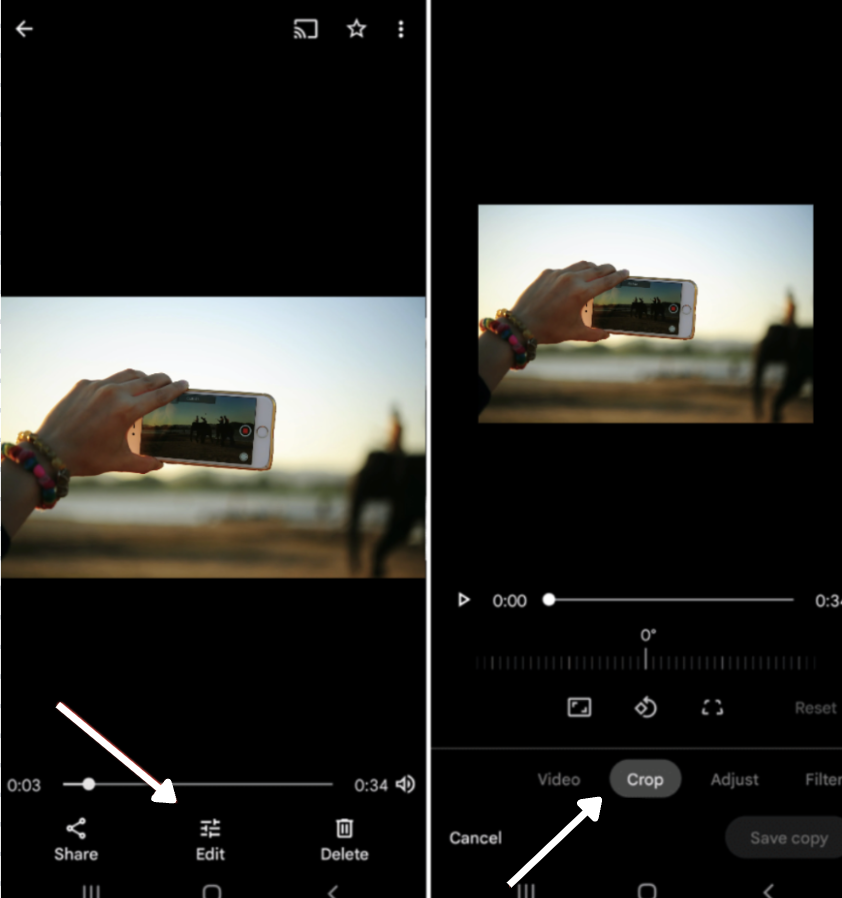
5. How to crop a video on iPhone
If you wish to crop a video on your iPhone, don't worry, because it's pretty easy.
- Open the Photos app on your iPhone and select the video you want to mofidy.
- Tap on edit; this should now display a bunch of editing tools on your screen.
- Choose the crop option and size the video however you like.
- Once you are satisfied with how the video looks, tap on save.
- If you think you’ve messed up, you can always press the Restart button present on the lower right side, which will restore your video to its original state.
- When you are done cropping the video, tap on Save Copy to save a copy of the cropped video on your device.
5 reasons why cropping your video is essential
Cropping a video has several benefits.
You can adjust the picture's dimensions to make it reflect your audience’s preferences and platform requirements. A cropping tool is also often used to remove any unwanted and irrelevant parts that might distract the viewers from the focal point of the video.
Let’s discuss all the reasons why a cropping tool is essential for your creation process.
1. To fit different social media platform requirements
Different platforms require different size specifications for the visual content you post.
For example, Instagram only allows 1:1 and 3:4 aspect ratios. If you took a full-sized photo with your phone, you’d have to crop it to a size that works on Instagram. Similar to that, Facebook, Twitter and other platforms have different picture and video requirements that you need to meet in order to be able to post.
It is also important to correctly crop your videos before posting them on your chosen platforms. You’ll not get likes, comments, shares, or views if your video is not correctly positioned.
From a business point of view, this simple mistake could end up costing you a lot. The more optimized your video content is, the better it’ll perform.
2. To remove unnecessary background clutter
We crop videos so as to remove all the background clutter. The clutter at the back can distract viewers from what you are actually trying to show.
For example, you’ve shot an interview video. During post-production, you notice your team members working in the background. That can be distracting for viewers. It shifts the focus from the interview to the people meandering in the background.
A big no-no for professional brand videos. Cropping allows you to easily remove distractions from the background and create a focused, targeted video for your viewers.
3. To fix a mistake or irregularity during screen recording
Ever recorded a video and realized you’ve unknowingly filmed objects and persons that were not supposed to be there? Or maybe you’ve taken the video at a wrong angle? Or you’ve shot the video horizontally but want to upload it in vertical format.
To fix such mistakes, you have the option to crop your videos and get rid of all the unwanted items. When you crop videos, you also won’t have to shoot again. It helps to maintain professionalism and add decorum to our videos, especially when you're posting branded content on platforms.
4. To cut the black bars from mobile videos
When you film a video using your phone, you’ll notice there are black bars on either side of the video. At times, the black bars look very off-putting and ruin the feel of the entire video, in which case it is best to get rid of them.
5. To show multiple video clips on one screen
Sometimes the videos and clips we make are differently sized. Where one may have been shot in a 1:1 frame, others could have been shot with a 9:16 frame. What to do when you want to compile these differently sized clips into a single video?
Easy. Use a cropping tool.
With this tool, you can resize each part and bring them to a uniform length. Thus, when compiled together and shown on a screen, they’ll look flawless.
How to crop videos for social media?
It would be great if all platforms accepted the same pictures and video sizes. Unfortunately, it doesn’t work that way.
Different interface designs of platforms require us to select and post photos with different dimensions.
To make the entire posting process easy for you, we’ve listed the dimension requirements of each platform and how to crop videos on these platforms.
1. Instagram
Instagram has several different sub-platforms where you can post your video content.
- Story
- Feed
- IGTV
- Carousel
- Reels
Vertical, full-screen videos are suitable for stories and reels. Whereas on the feed and carousel, the best formats are 1:1 and 4:5 (only slightly taller than 1:1) video sizes.
To crop a video for Instagram:
- Go to the app and tap on the add icon (+).
- Select the video you want to post and click on next.
- On the bottom left, Instagram will display 2 arrows indicating the tool for resizing.
- Tap on that icon to resize or crop your videos according to Instagram's size requirements.
- When you are sure, the video is cropped well, click on Next and post the video.
All done.
2. Facebook
Dimension requirements to post videos on Facebook are 1280 x 720 pixels.
Unlike Instagram, Facebook does not have a cropping tool to assist you, which is why you’ll need to crop your video beforehand.
You can do this easily through our super simple video editor - PlayPlay.
3. Twitter
Twitter video dimension requirements are 1280x720 for landscape, 720x1280 for portrait, and 720x720 for square.
While Twitter allows you to trim your videos' length, it has no such editing option to crop them. Again, you can use editing apps like PlayPlay to crop your videos for Twitter with ease.
4. TikTok
The video dimension requirement for TikTok is 1080×1920.
While TikTok has a great built-in video editor, it doesn’t yet allow you to crop videos. So you need to optimize your video before you attempt to post it to TikTok.
Posting the right-sized video on TikTok is very essential because that is the only form of content that is shared on the app. There are no stories, posts, or different options that other platforms do.
You only get one try, and you need to get it right.
Why?
Because with TikTok's algorithm and the way your video can reach thousands, if not millions, you stand to gain a lot.
Crop your next video with PlayPlay
Looking for the right video editing platform to crop your videos? You’ve come to the right place!
Using a video editing tool like PlayPlay can make your life infinitely easier.
PlayPlay provides a suite of video creation and editing features to help you create professional and engaging videos in just a few clicks.
Here are some of our favorite editing features:
- AI video assistant: Accelerate your video creation with our AI-powered tool. Instantly generate video drafts from simple text prompts, eliminating the need to start from scratch. Add subtitles and a voice-over for more of a professional look. Spark creativity with fresh video ideas and customize the draft to align with your brand, ensuring a polished product.
- Premium Stock Library: Gain access to millions of top-tier, royalty-free Getty assets - including images, videos, and GIFs. Elevate your videos with high-quality media that drives engagement and adds a polished, professional touch.
- Crop and Resize Videos: Effortlessly adapt your videos for any platform using PlayPlay’s multi-format resizing tool. In just a few clicks, reformat your content into vertical, horizontal, or square formats without compromising quality.
- Brand elements: Customize your product ads by incorporating your logo, brand colors, and other visual assets that strengthen brand recognition and consistency.
Try PlayPlay free for 7 days!