From the traditional classroom to virtual classrooms, our learning environment has changed dramatically in recent years. This rings especially true for methods that consumers use to obtain new information and learn how to do things.
Whether it’s putting together Ikea furniture or using a new software, YouTube users are 3 times more likely to watch online video tutorials about a new product than reading its instructions. Mobile learning and online instruction are more accessible than ever before, and students and professionals alike can even develop new career skills just by watching or participating in online courses.
There’s no denying that instructional videos have become an essential part of online learning and consumer purchase behavior, making it crucial to invest in institutional videos in terms of training as well as marketing strategies for most companies.
In this blog post, you'll discover 6 steps to making amazing instructional videos.
1. Choose your instructional video style
There are many different types of instruction videos out there and choosing the best one depends on your business goals. Ask yourself - what is the most engaging way you can present your unique information to audiences?
Here are some of the most popular formats that viewers search for in great instructional content.
Tutorials
Tutorial videos are a great way to teach viewers how to use a specific product or master a new skill by walking them step-by-step through the process.
These instructional videos are highly versatile. They can be animated or live-action video, or a combination of both! They work best as social media posts, to be posted on social platforms like Facebbok, Instagram and YouTube.
The following video by B&Q is an excellent example of a high-engaging tutorial video. It’s basic, does not have a lot of frills to it, yet explains the topic really well.
Explainer videos
An explainer video breaks down your product explanation into layman’s terms. If consumers don’t understand what your company does, they probably won’t buy into it.
Great explainer videos present the “what, how, and why” of your brand’s mission. They can also be used to explain industry trends and offer solutions for your audience’s burning problems.
Shorter explainer videos can also be used for social media marketing.
A great example is Figma’s introduction animated video. It is an animated video with a voiceover which makes it easy for them to explain a complex topic in an engaging way.
Here’s our curated list of software to make explainer videos on your own!
Presentation videos
This is a great way to repurpose your live presentation as fully online evergreen content. Record a live presentation and redistribute the video across multiple online channels for viewers to discover or rewatch on their own time. Don't forget to add relevant data and statistics to your videos like in infographic videos.
Screencast videos
This video type mirrors the instructors’ screen, making it perfect for technical explanations of online software and platforms.
Teaching someone how to use complex software in person is already a challenging task, so teaching with the exact interface of the tool is the most efficient and effective method for
Webinar demos
Webinars are longer in duration than most other formats, the average video runs around 60 minutes long. Webinars are hosted live by one or more speakers, beginning with introductions, presentation of the subject-matter, and finishing with a Q&A session. Live webinars can be recorded and redistributed across multiple channels after broadcast.
But if you’re uploading them to social media channels, make sure you upload short snippets of it. The entire video can easily be uploaded on YouTube.
A great example is Duarte’s webinar on Virtual Communication. It runs for around an hour, but the hosts keep it interesting throughout by adding animations to the presentation and engaging with the audience.
Sharing knowledge in your brand communication can also quickly make you a trusted expert. Curious to know how to make educational videos and transfer your learnings to others?
Instructional course series
Some of the most valuable benefits of online teaching and learning is a self paced experience and increased accessibility to education.
Many people who would otherwise be unable to attend in-person classes or commit to full-time curriculum can instead fit an online course into their schedule and budget.
PhotoShop Training Channel’s instructional video on using PhotoShop is a great example of an instructional course video. It teaches viewers everything they need to know about using PhotoShop.
Want to know how to make a mini documentary on your own?

How do you choose from the different video types?
When you’re just starting out, it can get a little difficult to decide which video type you should go with.
The best way to decide which video type you should invest in first is by determining where you’d like to upload it. Which marketing channel are you trying to build your brand presence on?
If it’s YouTube, then you can go for the longer length webinars, screencast videos, and instructional course series.
If it’s Instagram, then short and sweet content like tutorials and explainer videos work best.
2. Define your video concept
In order to make your messaging as concise and memorable as possible, your video concept should be presented as a single theme. The content of the video can then be broken down into different parts and sections to cover each point on the subject.
It can be tempting to add lots of information to an instructional video. However, if you cram too many different topics into one video, viewers can get overwhelmed and retain less of the information that you conveyed—that’s counterintuitive for learning.
How do you define your video concept?
Keep your business goals front and center
When developing your instructional video concept, don’t forget to take into account your overall business goal(s).
Is the goal to drive brand awareness, launch a new product, or gain new followers, for example?
This order of thinking saves time and ensures that the video delivers relevant results that both you and the viewers expect.
Understand your target market
A successful video concept is one that addresses the pain points of the target audience and offers solutions to it in a way that they understand.
Not only should your video concept revolve around the problems of your target audience but also should be shot and edited in layman-friendly language.
For example, you’re addressing small business owners for a digital marketing service you want to sell to them. Their main pain point could be creating budget-friendly high-converting websites, or they may have questions about incorporating local SEO in their marketing mix.
Creating instructional videos around this topic will help establish your authority in this target market and also help you subtly market your services to them.
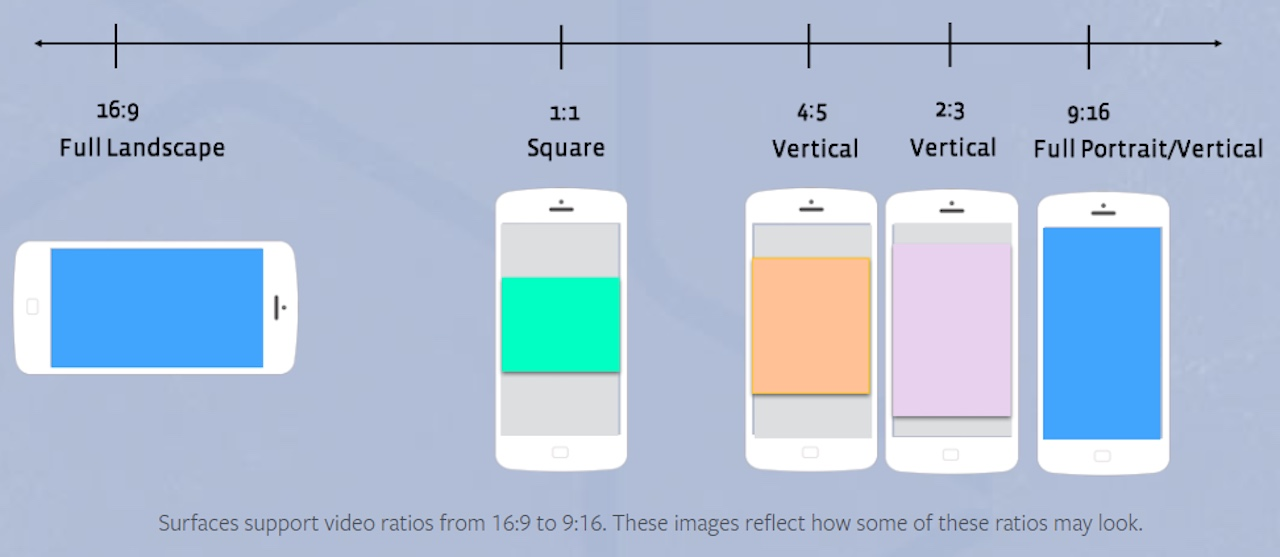
Every social platform has different video requirements.
While YouTube prefers longer, more educational content, Instagram is known for short and snappy videos. Moreover, if you want to embed your video on YouTube or your website, you need to shoot it horizontally. However, if you’re looking to upload your video on Instagram feed or LinkedIn, the video has to be square.
This choice influences the way you shoot (and edit) your video afterwards!
So, before working on your video concept, determine the video-length and video-style your audience prefers on the social platform you’d like to publish on.

PlayPlay Pro Tip
When developing your instructional video concept, don’t forget to take into account your overall business goal(s) and who your target audiences are. Is the goal to drive brand awareness, ensure a successful product kickoff with a product launch video, or gain new followers, for example? This order of thinking saves time and ensures that the video delivers relevant results that both you and the viewers expect.
3. Write a script and prepare a storyboard
Writing a solid script is the foundation to creating any strong video.
A solid script needs to have a strong opening hook, solution to your audience’s problem explained in an engaging manner, and a strong ending with a clear CTA,
Here’s our full guide to writing a great script that keeps viewers watching.
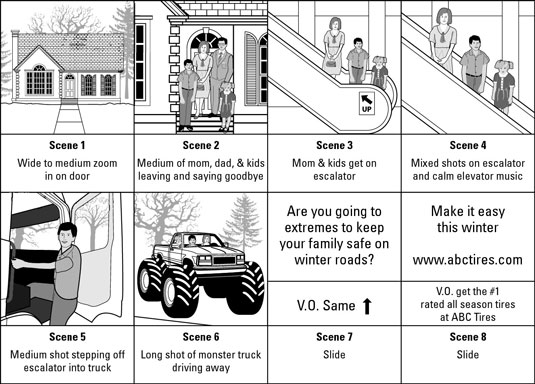
Next comes the storyboard, an important step to creating and setting the flow of your video content.
A storyboard is especially important when you’re creating a video with complex scenes and transitions. While instructional videos like simple tutorials, webinars or screencast videos do not necessarily require storyboards, storytelling videos involving multiple scenes and multiple people do.
Lay out how you envision your video to look scene by scene, taking into account the design, voice-over(s), and transitions. Rearrange as necessary until the narrative is just right. You can draw out your storyboard or create slides in a presentation to share with your team - whatever strikes your creativity!
When it comes to effective script writing and storyboarding, remember to structure your content and story in an easy-to-follow outline. Keep it simple and short - adding too many different settings or confusing back-and-forth transitions can distract viewers from the main message that you want to get across.

PlayPlay Pro Tip
Not sure how to gauge the length of your video while you’re writing the script? Try reading voice-over text aloud at a natural pace and time yourself. This will help you determine approximately how long the final video will be.
4. Film a live subject, use screen recording, stock media, or a combination
When it comes to filming your instructional video, there are countless creative options at your disposal. To decide which types of footage you want, start by taking into account your budget, timeline, script, and storyboard.
It’s great to think outside the box, and it’s also important to plan properly and maintain realistic expectations so you stay on budget to complete the project.
Here are valuable tips and common mistakes to avoid when filming different footage styles:
- For filming a live subject: Live-action videos work well because they can be highly relatable and emotive while bringing your brand to life. However for that same reason, it can be tricky to control all the elements in the scene while recording. Here’s a tip: Organize the frame of every scene so your viewers’ focus is kept on the feature product or concept that's being explained. You don’t want their attention wandering to the scenery in the background, regardless of how pretty it may be.
- For screencast recording: This may seem obvious—but don’t leave personal or non-related tabs open during a screen recording. Many people still make this mistake, especially when using their personal computers to screencast. To avoid having to re-record your video multiple times, close all tabs and programs that aren't necessary in your instructional video, well in advance.

PlayPlay Pro Tip
Add a branded background to your desktop to make the aesthetic of your screencast video more professional, this is especially true for sales video.
- For stock media: Stock photos and video can be such life-savers, especially when we’re on a tight budget or deadline. Just make sure you use high-quality footage, or it can reduce the overall quality of your own instructional video. Consistency and quality in video footage is more important than quantity of different shots.
5. Choose a video creation tool
Depending on your experience level in video creation, there are a plethora of different video making tools and production agencies available on the market. Choosing the right one can feel overwhelming, so make sure you get a solution adapted to your needs.
However, if you're a beginner or looking for a DIY option to make your instructional videos, we recommend choosing a tool that's simple and intuitive to use.
With PlayPlay, the video creation platform for the enterprise, anyone on your team can design videos that make sure your message gets across. It is one of the most intuitive video maker tools, which saves you time (and money!) with its extensive features, guides, and professional video templates to choose from.
It’s appropriate for both professionals who’ve never made a video before and those who regularly make video content, but want a quicker and efficient way to make more videos for their company.
6. Edit your video
The editing phase is the magic that really pulls your instructional video together into one cohesive piece of content. Discover PlayPlay's tutorial video maker, the ultimate tool for effortlessly creating professional videos. Transform your ideas into captivating videos in no time.
Here are key takeaways to remember when you’re chopping and cropping your footage:
Work on the narration of your video
We’ve already mentioned this once before in this post, but it’s for a good reason. Voice-over won’t be used in every video, but when it is, make sure the person reading is clearly understandable. Do multiple recordings, and don’t be afraid to edit together versions of different recordings to create the best final result.
Add catchy music to your content
Adding an appropriate track or melody can really enhance the effect of your instructional video. Choose a track that matches your video's mood and draws viewers into the story—but make sure it doesn't distract them from your key message.
Embed captions in the video
A report by Verizon and Publicis Media revealed that 50% of consumers said captions are important because they watch videos with the sound off. With an increasing number of consumers watching videos on mute as the default, adding subtitles to your videos is a must. In the same report, they found that adding captions actually boosted ad performance, with a 10% increase in ad memory quality and 13% increase in brand linkage.
Add video transitions
Adding video transitions to your instructional video isn’t just for vanity and aesthetics. They determine the pacing of the video, and good video transitions will grab and hold viewers attention until the very end of your story. Motion design transitions are popular and provide plenty of creative freedom to use with different video styles.
Use creative effects
Even if you’ve picked great music and used amazing voice-over talent to narrate your video, the truth is none of that matters if consumers watch with the sound off. This means viewers need more context and visual clues to help them…
- Understand the video content without sound
- Keep them highly engaged
Great news is that you can easily do this by adding dynamic text overlays, colorful illustrations, or other graphic designs to highlight the main content and explanations in your instructional video.
Finish up with a great call-to-action
This point applies to all marketing videos, not just instructional videos. Your video should end with a strong, simple, and compelling call-to-action. Depending on what your business goal is, examples of great CTAs are:
- Visiting your website
- Downloading branded content
- Contacting a customer service or sales representative
- Subscribing to the channel and sharing the video with your network…
Ready to create?
Now that you’ve learned about these 6 steps, you’re well on your way to creating amazing instructional videos that viewers will be searching for.
Want to jump right into it? Whether you want to make a commercial video, your first professional instructional video, real estate videos or more, sign up now to try PlayPlay's 7 day free-trial!
Melissa Francois
Head of Global Content & Comms
With over 10 years of experience in the wild world of SaaS, Melissa cares about building great brand stories and driving community engagement through engaging content. Off the clock, she enjoys long walks and a pint in a cozy country pub.


